This blog post will detail my experience utilizing Shader Graph to randomize 16×16 pixel textures on a grid structure.
Step 1: Import Textures as Texture2DArray
To begin, the texture should be imported as a Texture2DArray via the inspector.
Step 2: Create a Shader Graph
Create a new Lit Shader Graph (URP) and open it.
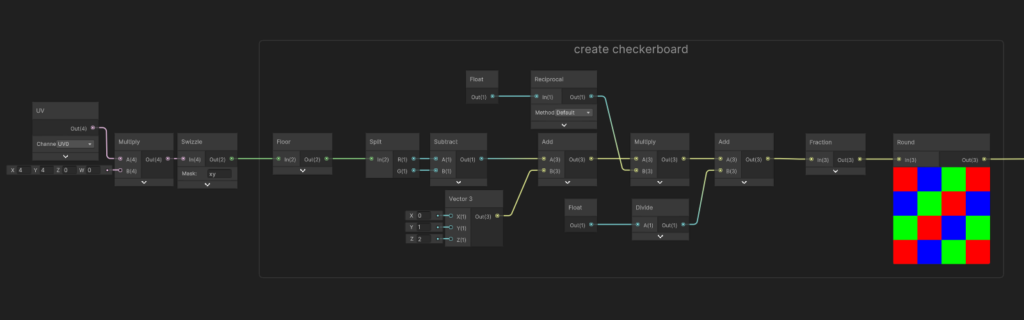
Step 3: Create a procedural checkerboard structure
Next, a checkerboard structure needs to be generated to map a tile of the texture onto the mesh’s surface. I accomplished this by utilizing some basic math in Shader Graph.
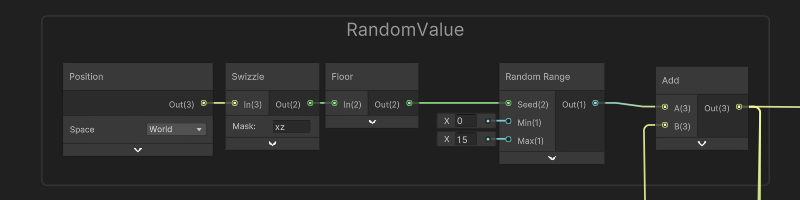
Step 4: Create a random value for each tile in the checkerboard
Once the checkerboard structure was established, I created a random value for each tile based on its location in world space.
Step 5: Use the random value to assign a texture to a checkerboard tile
This is where the magic happens. This random value was used to assign a texture to a checkerboard tile via the Sample Texture 2D Array node.
And this is the final product.
Sounds rather complicated. Why go through all that hassle?
Well the thing was that I first tried to spawn one gameobject for each tile I would use and place them together in a random fashion. This netted about 50k gameobject just for the placement of the ground. As this is a far too large amount of gameobjects I decided to try other things and had the idea to populate one given large plane which led to this solution.
Bottom Line
In conclusion, using Unity Shader Graph to randomize textures is a great way to add variation and depth to game environments as well as optimize your game (as for my usecase). By combining procedural structures with predefined textures and assigning them in a random fashion to this structure one can create landscapes with minimal effort.